This manual provides comprehensive guidance for installing the UVC9360SLSS ventilation hood, ensuring safety, compliance, and optimal performance. It covers essential steps, safety precautions, and technical requirements for a successful installation.
Overview of the UVC9360SLSS Ventilation Hood
The UVC9360SLSS is a high-performance, custom insert ventilation hood designed for seamless integration into kitchen layouts. It features dimmable LED lighting for enhanced visibility and operates with a powerful motor to efficiently ventilate cooking areas. Suitable for under-cabinet or custom installations, this hood combines modern aesthetics with superior airflow management. Equipped with baffle filters, it effectively captures grease and odors, ensuring a cleaner kitchen environment. The unit is built to meet safety standards and includes features that prevent electrical hazards, making it a reliable choice for home ventilation needs.
Importance of Proper Installation
Proper installation of the UVC9360SLSS ventilation hood is critical for ensuring safety, performance, and compliance with local codes. Correct installation prevents hazards such as electrical shocks or fires and guarantees optimal airflow and filtration. Improper installation can lead to reduced efficiency, increased noise, and potential safety risks. Adhering to the manufacturer’s guidelines ensures the hood functions as intended, providing reliable ventilation and maintaining indoor air quality. Failure to follow instructions may result in voiding the warranty or causing long-term operational issues. Proper installation also ensures compliance with fire-rated construction standards and electrical safety requirements, safeguarding both the user and the property.
Safety Precautions and Requirements
Installation must comply with electrical and fire-rated construction standards. Ensure all work is done by qualified professionals to guarantee safe and reliable operation of the UVC9360SLSS hood.
Electrical Safety Guidelines
Installation must be performed by qualified professionals to ensure compliance with electrical codes and standards. The UVC9360SLSS hood is equipped with features that limit maximum CFM levels to meet local regulations. Avoid using solid-state speed control devices with this unit, as they may cause operational issues. Always connect the power supply leads correctly: attach the white (neutral) lead to the white lead of the range hood and the black (live) lead to the black lead using wire nuts. Ensure all connections are secure to prevent electrical hazards. Refer to the manual for detailed wiring instructions and safety protocols.
Fire-Rated Construction Compliance
Ensure the installation complies with local fire-rated construction standards. Use fire-rated materials for the soffit and surrounding areas. Install the exhaust duct with fire-resistant components to maintain safety. Seal all duct joints with fire-rated sealants to prevent leaks. Verify that the soffit and ductwork meet local building codes for fire resistance. Refer to local regulations for specific requirements. This ensures the system operates safely and adheres to fire safety standards. Always consult the manual for detailed compliance guidelines.

Unpacking and Inventory of Components
Unpack the UVC9360SLSS ventilation hood and verify all components are included. Check for the hood, ducting, vent grill, screws, and installation hardware. Ensure no parts are damaged.
Checking the Contents of the Package
Begin by carefully unpacking the UVC9360SLSS ventilation hood and verifying all components are included. Check for the hood unit, exhaust duct, vent grill, screws, and installation hardware. Ensure no parts are damaged or missing. Refer to the provided inventory list in the manual to confirm the completeness of the package. If any items are missing or damaged, contact GE customer support immediately. Properly accounting for all components ensures a smooth installation process and prevents delays. Cross-reference each item with the manual’s inventory list to avoid discrepancies. This step is crucial for a successful and hassle-free installation; Always handle components with care to prevent accidental damage.
Identifying Key Parts and Accessories
Before starting the installation, identify all key components and accessories included with the UVC9360SLSS ventilation hood. The package includes the hood unit, exhaust duct, vent grill, mounting hardware, and electrical connectors. Additional accessories may include LED lighting modules, filters, and duct clamps. Familiarize yourself with each part to ensure proper installation. Cross-reference the components with the manual’s inventory list to confirm everything is accounted for. If any items are missing or damaged, contact GE customer support. Proper identification of parts ensures compliance with safety standards and guarantees a smooth installation process. This step is essential for achieving optimal performance and functionality. Always refer to the manual for detailed descriptions and diagrams of each component.
Preparing the Installation Site
Ensure the installation area is clear of debris and obstructions. Verify measurements for proper fit and alignment. Check ventilation pathways for unobstructed airflow and compliance with local codes.
Measuring and Marking the Installation Area
Accurate measurements are crucial for a proper fit. Measure the cut-out dimensions in the soffit, ensuring they match the hood’s specifications. Reference the manual for exact measurements. Use a marker to outline the installation area clearly. Ensure the space is free from obstructions and that the soffit can support the hood’s weight. Double-check all measurements to avoid errors during installation. Proper alignment and leveling are essential for both functionality and aesthetics. Follow the manufacturer’s guidelines for marking the area to ensure compliance with safety and performance standards.
Ensuring Proper Ventilation and Clearance
Proper ventilation and clearance are critical for safe and efficient operation. Ensure the installation area has adequate space for airflow and meets the minimum clearance requirements from combustible materials. Install the vent grill securely over the exhaust duct, ensuring it is level and properly sealed. Use duct tape or sealant to prevent air leaks. Verify that the ducting system is correctly aligned and free from obstructions. Maintain the recommended clearance distances specified in the manual to ensure compliance with safety standards and optimal performance. Proper ventilation ensures efficient airflow and prevents potential hazards.
Electrical and Ducting Connections
Connect the power supply wires to the hood’s electrical terminals, ensuring proper wire matching. Install the exhaust duct securely, sealing joints with duct tape or sealant for airtight connections.
Connecting the Power Supply
To connect the power supply, attach the white (neutral) lead from the power supply to the white lead of the range hood using a wire nut. Secure the black (live) lead from the power supply to the black lead of the hood. Ensure all connections are tight and insulated. If unsure, consult a licensed electrician. Verify the voltage matches the hood’s requirements. Double-check connections for safety and compliance with local electrical codes. Proper electrical connections are critical for safe and efficient operation of the ventilation hood. Always refer to the manual for specific wiring instructions and guidelines. Ensure the power supply is appropriately grounded to prevent electrical hazards.
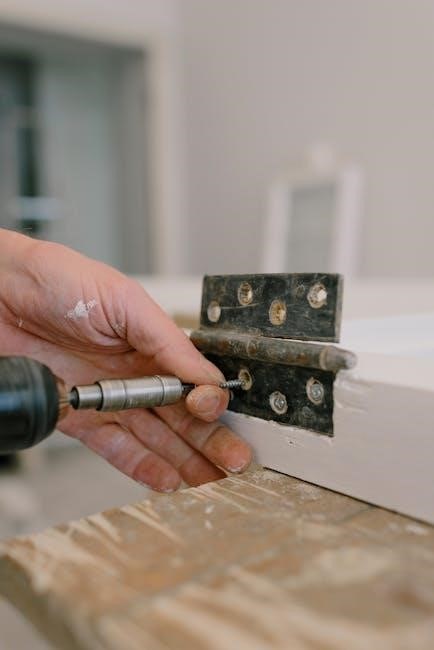
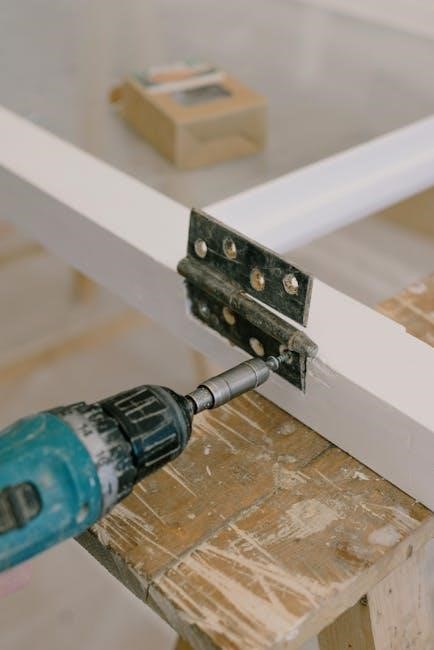
Installing the Exhaust Duct and Vent Grill
First, cut a hole in the soffit to accommodate the exhaust duct. Install the duct, ensuring it is securely fastened to the range hood. Attach the vent grill over the duct opening, aligning it properly for a seamless fit. Seal all duct joints with duct tape to ensure an airtight connection. Verify that the duct size matches the hood’s specifications for optimal airflow. Check local building codes for any additional requirements. Use appropriate materials, such as aluminum ducting, to ensure durability and compliance. Finally, ensure the vent grill is securely fastened to prevent it from detaching during operation. Proper installation ensures efficient venting and safety. If unsure, consult a professional.
MOUNTING THE HOOD AND FINAL CONNECTIONS
Mount the hood by aligning it with the duct and securing it to the soffit using provided hardware. Ensure proper alignment and stability for safe operation.
Securing the Hood to the Soffit
To secure the hood to the soffit, attach the mounting brackets to the hood and align them with the pre-drilled holes in the soffit. Use the provided screws to tightly fasten the brackets, ensuring the hood is level and evenly spaced. Double-check the alignment to prevent any imbalance. Once secured, seal any gaps around the mounting area with duct tape to ensure a proper fit and prevent air leaks. Tighten all connections firmly to avoid vibration or movement during operation. Refer to the manual for specific torque specifications to ensure a stable installation.
Sealing Duct Joints and Ensuring Proper Fit
After installing the exhaust duct, inspect all joints for gaps or misalignments. Use high-quality duct tape or sealant to cover all connections, ensuring airtight seals. Verify that the duct fits securely against the hood and soffit, with no visible gaps. Properly aligned and sealed ductwork is crucial for efficient airflow and to prevent leaks. Once sealed, perform a final inspection to ensure all connections are secure and free from looseness. If necessary, make adjustments and reinforce seals with additional tape to guarantee a tight, stable installation that meets safety and performance standards.
Testing and Final Inspection
Testing involves turning on the hood to verify proper electrical connections and airflow performance. Conduct a final inspection to ensure all components are securely installed and functioning correctly.
Verifying Electrical and Airflow Performance
After installation, turn on the hood to test electrical functionality. Ensure the fan and lights operate smoothly. Check airflow by verifying proper duct connections and exhaust vent performance. Measure CFM levels to confirm compliance with local codes. Inspect for any air leaks or unusual noises. Attach the white and black leads securely to their respective terminals. Ensure the duct joints are sealed with duct tape for optimal airflow efficiency. Verify that the vent grill is installed correctly to prevent airflow restrictions. This step ensures the hood operates safely and efficiently, meeting all performance and safety standards outlined in the manual.
Ensuring Compliance with Local Codes
Compliance with local codes is crucial for the safe and proper installation of the UVC9360SLSS ventilation hood. Installers must consult local building codes and regulations before starting the project. The product is designed to meet certain standards, but local codes may have additional requirements. Verify that all components, including electrical connections and ductwork, meet fire-rated construction standards. Ensure that CFM levels do not exceed local code limits to maintain compliance. Proper adherence to these regulations ensures the hood operates safely and efficiently, avoiding potential issues or violations. Always follow local guidelines to guarantee a lawful and functional installation;